
I will explain to you in detail how to transfer apps from Android to iPhone in different ways, through a special application or manually. In addition, I will also show you how to transfer your photos, videos, documents and much more so that you do not lose anything.
You recently evaluated the idea of changing your smartphone from Android to iPhone , but you are worried about losing your favorite apps and having to change your usage habits related to managing documents, photos, browsing online and so on. Well, I understand you. Don’t worry though: there are numerous solutions to migrate apps between Android and iPhone, all of which are quite simple to use and put into practice.
How To Transfer Apps From Android To iPhone.
- How to transfer apps from Android to iPhone
- How to transfer an app from Android to iOS
- Mail, calendars and contacts
- Photo and video
- Music
- Books, PDFs and Documents
- How to transfer Whatsapp from Android to iPhone
How to transfer apps from Android to iPhone.

If your goal is to migrate all apps at once , in the fastest and “painless” way possible, you can use Apple’s Switch to iOS app , available free of charge for all Android devices on the Play Store ( and on alternative stores for smartphones that do not use Google services, such as some HUAWEI devices).
What you have to do, therefore, is to download it on your Android device : to proceed, take your smartphone, tap on the Play Store icon (or the store you normally use) and, in the search bar at the top, type ” Switch to iOS “ . Then tap on the first result displayed on the screen and, in the new screen opened, press the green Install button . Then wait for the download to complete and tap the Open button to start the app.
At this point, press the blue Continue button , then press the Accept item (to accept the terms and conditions) and choose whether to send your analysis data to Apple in order to improve the app by pressing on the item Send automatically or on that Do not send .
Authorize, therefore, the app to access the location of the device, by pressing the Allow item only while using the app (keep in mind that to transfer the data it is mandatory to authorize the location).
Now take the iPhone to which you want to migrate the data and, if it is used or if you have already initialized it, start the initialization process again. In fact, in it there is a setting to migrate data from Android to iOS.
To do this, tap on the Settings icon (the one with the gear), then press on the General> Transfer or initialize iPhone items and, finally, select the option Initialize content and settings . Now, in the new screen that opened, tap the Continue button , wait for the data to be uploaded to iCloud and press the Initialize iPhone button to start the procedure.
I remind you that this format deletes all the data on the iPhone, including the Apple ID and allows you to get a smartphone as good as new. If the space on iCloud is sufficient and alternatively I advise you to buy a larger quantity by following the advice of my specific tutorial , the data can still be saved on a backup in it, but not all.
For this reason, before proceeding, I recommend that you manually perform some backups by following the instructions in the following paragraphs . At this point, everything is ready to proceed with the actual transfer.
- On iOS– insert a SIM and run the on-screen wizard to initialize the device. Then select the language , the country , then click on Configure manually , then connect to a Wi-Fi network, type the password and click on the Login item , located at the top right and then on the Next item . Now press the blue Continue button , choose whether to configure the Face ID / Touch ID or to proceed later ( Set up later in settings ), create an unlock codefor your iPhone, confirm it by typing it again and, in the new screen that opens, select the option Migrate data from Android . Lastly, tap the blue Continue button and you will see a 6-digit code appear to be saved to enter it in the appropriate screen of the Android smartphone.
- On Android– on the screen for entering the code, type the digits you saw appear on the iPhone and wait for the temporary connection between the two devices to be established. Then, once the connection is successful, if necessary, press the Allow button to allow Switch to iOS to perform all the necessary operations. If the operation fails, try to disconnect the Android smartphone from Wi-Fi and reconnect it, then try the procedure again. Now you just have to select all the data you want to export from Android to iPhone from the list that is presented to you, press the Next button and wait for the procedure to finish. Once finished, press the Finish button .
- On iOS– after the data transfer you can continue with the configuration of the iPhone: enter the Apple ID or create one , press the Accept button to accept the terms and conditions, choose whether to activate automatic updates , whether to configure the location , whether to configure Apple Pay , Siri , Usage time , whether to send diagnostic data to Apple, then set the use of True Tone , choose which theme to use between the two proposed and the screen Zoom modeyou want to adopt. Once the configuration is complete, you will be asked to enter the password of the Google accounts exported from Android and you will be asked if you want to download the apps that were present on your Android smartphone and that are also available for iOS. Answer affirmatively and you will be successful in your initial intent! Keep in mind that this procedure also applies if your desire is to know how to transfer purchased apps from Android to iPhone , even if they are present in the App Store, they will be downloaded and maintained with the same type of subscription.
For more detailed information on the use of this app for transferring from Android to iOS I suggest you also consult my tutorial dedicated entirely to Switch to iOS , where you will find more explanations.
How to transfer an app from Android to iOS.
The “Switch to iOS” app isn’t for you because you don’t want to erase the iPhone? Then you can manually export the content that interests you, even if the procedure becomes slightly longer and more complicated.
Also keep in mind that you cannot run it to transfer the apps in the stores of both operating systems : what you can do, in this case, is to manually download the various apps you used previously on Android from the iPhone App Store (when present ). For everything else, however, there are solutions that I will list below.
Mail, calendars and contacts.
For this particular category of data there are no problems. iPhone, in fact, supports providers such as Google , so you can also use your Google account on the Apple smartphone, set it as primary and keep your emails, contacts and calendars unaltered by using them exactly as you did before.
The first thing to do, however, is to check on the Android device that synchronization is active (keep in mind that it should be by default, but checking is never a bad thing). To do this, take your smartphone, tap the Settings icon and then follow the path Account> Google> [your email address] . Then make sure that the levers are moved to ON next to the items that interest you such as Calendar , Contacts , Gmail and so on. More info here .
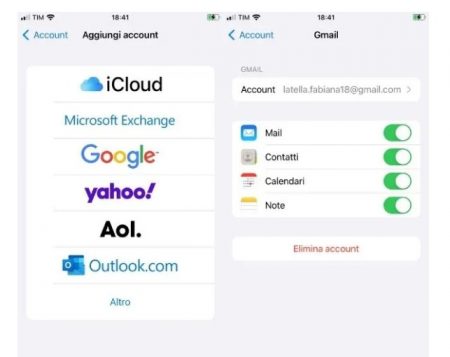
Now you must then go to enter your Google account on the iPhone : tap on the Settings icon , then press on the Mail item and finally on the Account option . In the new screen that opened, press on the Add account item , then tap on the Google icon and finally on the Continue button to allow access to Settings on the Google website; then type the email address associated with the Google account you want to use and press the Next button .
In the new screen that has opened, repeat the same operation, this time entering the password . Finally, decide what to synchronize by moving the levers to ON next to the Mail , Contacts , Calendars and Notes items , then to conclude, press the Save Mail item at the top right of the screen.
Then remember to set the Gmail account as the default for contacts: I explained how to do it here .
Photo and video.
In case your desire is to manually transfer your media files from Android to iPhone you can proceed in several ways. The most practical is to use cloud storage services , such as Google Photos or iCloud Photos . However, depending on what you have decided to use, you have to proceed in a different way.
If you’ve bought Google Photos, just download the app to your Android device via the Play Store , launch it, log in using your Google account and sync your entire photo library to its storage space. Once done, you can download the app also on your Apple device through the App Store , log in with the same Google account and quickly find all your synchronized content. More info here .
If you prefer to use iCloud Photos , instead, you must first download all your images and videos to your PC: using a Windows PC you just need to connect your Android smartphone with the USB cable, tap the File Transfer item on the phone screen and go to locate the device ( File Explorer> This PC> Phone Name ) and the related folders dedicated to images, usually under the heading DCIM> Camera .
If you are using a Mac , however, you must first download Android File Transfert , a free software that allows you to transfer Android files to the macOS operating system. Then connect to the official web page of the service , press the DOWNLOAD NOW button and wait for the .dmg file to be downloaded .
Then press twice on it and, in the opened panel, drag the application icon into the Applications folder . Once this is done, open Android File Transfert by clicking on its icon in the Launchpad and, from the open panel, look for the DCIM> Camera folders . In case you have problems connecting an Android device to your PC , consult my dedicated guide.
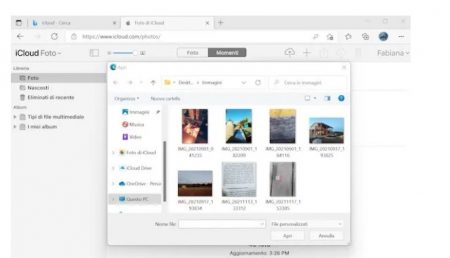
Once in the folder containing the photos, select them all, copy them into a new folder on your PC’s Desktop / Desk, then open the Web version of iCloud , if necessary log in with your Apple ID credentials (if necessary, authorize the operation via a second Apple device by entering the appropriate code) and, once entered, press the Photo icon . Then, click on the Upload photo icon (marked with a bubble and an arrow pointing upwards), follow the path to the Desktop / Desktop and click on the folder containing the images, then click on the Open button . Select all the photos you want to upload and press the button againOpen . This way the photos will be uploaded to iCloud.
Now, on the iPhone , by going to activate the synchronization of iCloud Photos by following the path Settings> your name> iCloud> Photos and moving the lever to ON next to the iCloud Photos item , the entire library present before on Android will also be synchronized on iPhone. More info here .
Music
You usually use an app to play your songs like Spotify or Amazon Music , you can quickly deal with the problem by downloading this app directly to your iPhone, logging in with the same account you used on your Android smartphone.
If, on the other hand, you want to transfer downloaded songs and contents inside the memory of your Android device to your new iPhone, you can proceed using your computer. So, if you are using a Windows PC or a Mac, connect the Android smartphone and the iPhone to the PC, open the Music folder contained within the Android device (using Android File Transfert in case of macOS operating system), select all the items that you want to carry and put them in a new folder on the Desktop / Desktop.
Then open iTunes , press on the Music item under the heading Settings and put the check mark next to the item Synchronize music . Then click on File> Add File to Library , then select the folder in which you have inserted the music and all the songs in it , click on Open and then, from the iTunes screen, click on the Apply button , to start the synchronization of songs. Now, by clicking on the Music item , under the heading On the device you will see all your songs that have also been synchronized on the iPhone.
Using the Finder, on the other hand, locate the iPhone from the list on the left of the window then, in the new panel opened, press on the Music tab , put the check mark next to the item Synchronize music on [iPhone name] and drag the previously selected files, lastly press the Sync button . Easy, right?
Books, PDFs and Documents.
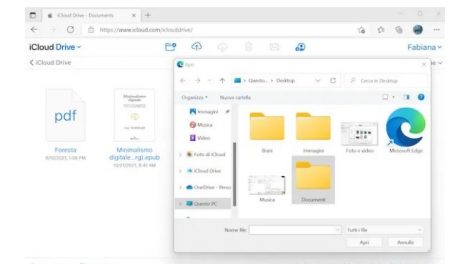
The same rule as described in the previous chapter dedicated to photos and videos also applies to books, PDFs and documents . Everything can be transferred via apps such as Google Drive or Dropbox simply by downloading these applications on your iPhone and logging in with the same account used on Android. Alternatively, as always seen for photos and videos, your documents of various kinds can be synchronized via iCloud Drive, using the same method seen previously via the web version of iCloud.
Alternatively, you can manually copy the files you want to transfer, extracting them from the Android Documents folder via your Mac, saving them on your computer in a specific folder on the Desktop and inserting them in the Books or Files tabs of the Finder , depending on the type. of document.
How to transfer Whatsapp from Android to iPhone.
Your wish is to know how to transfer apps from Android to iPhone , specifically the WhatsApp app ? So, in that case, the first thing you can do is transfer your account from one device to another. Keep in mind, however, that by doing so you will lose the chats on your Android device, but you will still remain inserted in all groups and people will be able to contact you as if nothing had happened.
To proceed, all you have to do is download WhatsApp on your iPhone using the App Store , start it and press on Continue and log in , enter the phone number of your account, then press on the Yes item in the box that has opened to confirm the correctness of the number and, finally, enter the code received on that same number via SMS. This way the account will be deactivated on the Android smartphone and activated on the iPhone. More info here .
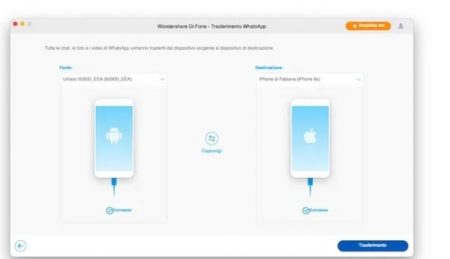
To keep the chats and not lose them during the transfer, however, it is necessary to use a third-party software. My advice, in this case, is to download Wondershare dr.fone – WhatsApp Transfer , at a price of 21.99 euros for the one-year license (1-5 mobile devices on 1 PC) or 29.99 euros for the lifetime license (1-5 devices on 1 PC).
This is an excellent application that allows you to transfer WhatsApp from Android to iPhone , but also from iPhone to Android, or between the same operating systems, in an extremely simple and fast way (keep in mind that you can test the trial version but for the actual use requires purchasing a license). To find out more I suggest you read my tutorial where I talk about it in depth.