
Windows Cannot Access Shared Folder Windows 10.Which is used to send information contained in files, documents and presentations (among others) to other users.However, several users have reported problems or errors that occur in the operating system when trying to enter any of the folders that the device has, here you will learn how to open shared folders in Windows 10.
Why can’t I open shared folders in WINDOWS 10? Fix;Windows Cannot Access Shared Folder Windows 10
Index( )
- What to do if it is not possible to access a shared folder in Windows 10?
- Check that the ‘File Sharing’ setting is enabled
- Using network stop for ‘cannot access shared folder’ error
- How to open a shared folder if this problem persists?
- Check computer credentials
- Enable network services on your PC
- How to run Windows 10 ‘Troubleshooter’?
Fix;Windows Cannot Access Shared Folder Windows 10
There are numerous ways to fix Windows 10 shared folders problem, a good tip is to check that all the programs that Windows uses to perform this action are enabled . That is, the detection of networks, system network services or having the Windows file sharing option enabled, among other programs.
Check that the ‘File Sharing’ setting is enabled
It is possible that trying to exchange a file or document in a folder does not allow this action to be executed, this may be due to the fact that the ‘File Sharing’ function is disabled and is the cause of the problem, to enable said function proceed to perform the following indications:
- On the main Windows screen, go to the Windows start menu and on the left panel, click on the gear icon called ‘Settings’.
- It will direct you to a new tab called ‘Windows Settings’ and click on the Network and Internet option.
- In the left panel, click on the option called ‘Status’ represented by the icon of a monitor and a world network.
- Next, on the right side of the screen, find and click on Sharing optionson the computer screen.
- In the ‘File and printer sharing’ section you must check the box ‘Enable file sharing on printers’ and you will have already enabled this function. When finished, click on ‘Save changes’.
Using network stop for ‘cannot access shared folder’ error
In case the previous procedure does not work, you can also use network detection for shared folders, to achieve this, follow the following procedure:
- Enter the Start menu with the Windows icon and press the ‘Settings’ option. Then, go to ‘Network and Internet’.
- Go to the ‘Status’ optionon the left side of the screen and then ‘Sharing Options’.
- Now, in the ‘Network detection’ panel, you must activate network detection by selecting the box next to the option. When you finish with the configuration you must touch on ‘Save changes’.
How to open a shared folder if this problem persists?
Another way to fix the problem is by using a Windows 10 command to enter it and fix the persistent problem, to do so proceed with the following steps:
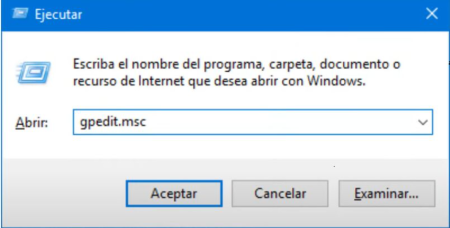
- Simultaneously press the key with the Windows icon and the letter ‘R’, in this way the ‘Run’ program will open.
- In the field type the command ‘gpedit.msc’ and click ‘OK’. In the new tab, click on the Administrative Templates folder.
- In the options that will be displayed, click on the next folder called ‘Network’ and then on the right side of the screen click on ‘Lanman workstation’.
- On the Settings tab click Enable unsecure guest logins. In the new box that will appear, check the ‘Enabled’ option.
- Finally, click on the ‘Apply’ option located in the right corner of the box and then on ‘OK’, by doing this you should already be able to access the shared folder.
Check computer credentials
If the previous methods are still without results, you can try other procedures that will be explained in this tutorial, including the computer’s credentials. To do so, execute the following step by step:
- Open the Windows 10 menuand look in the field for ‘Control Panel’, click on the program that appears.
- Then , go to User accountsrepresented by the icon of two people, then click on ‘Credentials Manager’ in the alternatives that will be displayed.
- Now, in the new tab, click on the option called ‘Windows credentials’ and click on ‘Add a new credential’.
- Complete the missing fields with information and when finished, select the ‘Accept’ optionfound on the right side.
Enable network services on your PC
In order to access shared folders, all network services must be activated in Windows 10, to do so, follow the procedure below:
- Proceed to enter the Windows menu and look for ‘Run’, when loading the search results click on the program.
- In the small box that will appear, write the following command: services.msc and click on the ‘OK’ option to open the program.
- To finish, you must right-click with the mouse on Automatic WLAN Configurationand then on ‘Start’. All network services must be connected and activated for the procedure to be correct.
How to run Windows 10 ‘Troubleshooter’?
Windows 10 and its previous versions have the tool called ‘Troubleshooter’ that is very useful to analyze and correct this type of problem , proceed with the following steps:
- Go to the ‘Settings’ in the Windows menu and in a new panel click on the ‘Updates and Security’ option.
- On the left side of the new tab, tap on Troubleshootingand then on the ‘Shared folders’ option.
- Finally, you must restart the computer to verify that it now allows you to access the shared folders on it.