
You have recently purchased your first iPhone and you are quite satisfied with your purchase. You’ve started messing around with your new Apple-branded smartphone and you’ve realized that there are some functions and operations that you’re not very familiar with.
Since you want to fill these gaps to make the most of all the potential of your “iPhone”, you have thought of turning to me for help in this regard. Well! How about, then, we start with the photo format? Was this exactly what you wanted to explore? Very good!
Make yourself comfortable, take all the time you need to concentrate on reading the next lines and, even more importantly, implement the “tips” that I will give you, so that you can understand well how to change iPhone photo format. There’s nothing left for me to do other than wish you happy reading and good luck with everything!
Index
- How to change the photo format on iPhone
- How to change photo format from HEIC to JPG on iPhone
- How to change iPhone photo size
How to change the photo format on iPhone
If you intend to change the format of photos on your iPhone, you can take advantage of Apple’s very convenient Short Commands app, which is already installed on your device (in case you uninstalled it, you can reinstall it from theApp Store). In case you don’t know it, it is a very powerful app that allows you to create and install scripts to make the phone perform certain automations. These can be created from scratch, in complete autonomy, or they can be downloaded ready for use.
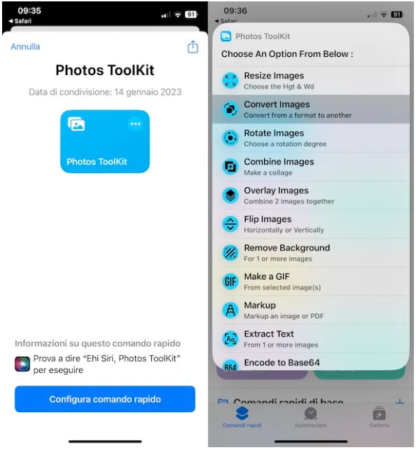
Luckily for you, there is a quick command useful for this purpose, that is, changing the format of photos on the iPhone, which you can freely download and use. It’s called Photos ToolKit and now I’ll show you how to use it to change the format of photos (although in reality this script allows you to perform many other operations).< /span>
To begin with, download the shortcut to your “iPhone”. To do this, visit this Routinehub page and press the Get Shortcut button (or visit this web page directly), then press the button Get shortcuts, located at the bottom of the page. Subsequently, tap on the Configure shortcut button, which is present in the Shortcuts app screen that appears on the screen and press + Add shortcut.
At this point you will have added the command and you can use it to convert the photo format. To do this, go to the Quick Commands screen of the Quick Commands app (reachable by tapping on the appropriate wording, at the bottom left of the screen) and do tap on the blue box that says Photos ToolKit.
Next, select the type of operation you intend to carry out (in this case, therefore, Convert Images), select the photo to convert by pressing on its preview (in the menu that opens) and then press on the wording Add (top right of the menu in question). Please note that you can select more than one photo.
Now, select the output format you prefer from the appropriate menu that appears on the screen (e.g. Convert to PDF, Convert to PNG, Convert to JPEG a>) and eventually decide whether or not to allow the shortcut to receive notifications, so as to know when the conversion of the photo is finished.Allow once, answer with the privacy option that best suits you? you like (e.g. Do you want to allow “Photos ToolKit” to save 1 contact and 1 photo in a photo album, etc.). To the question,
How to change photo format from HEIC to JPG on iPhone
Have you come to this guide to change photo format from HEIC to JPG on iPhone? In addition to doing this using the shortcut I showed you in the previous chapter, you can use theFile app for this purpose of iOS. To be clear, it would be the app pre-installed on all “iPhone phones” through which it is possible to explore the internal memory to act on the various files present in the latter.
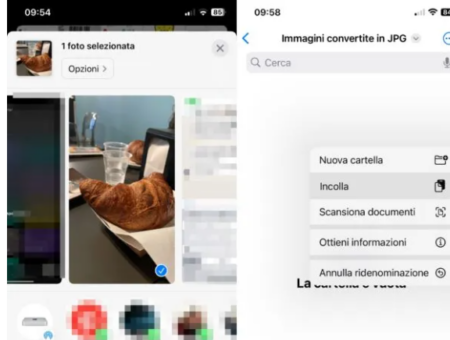
To use it for this purpose, you must first open the Photos app and select thealbum where the photos you intend to act on are present. Then tap on the item Select (top right), tap on the previews of all the photos that are of interest to you and, then, press on the arrow icon pointing upwards inside the square and tap on the wording Copy photo .
Next, open the app File by pressing the white icon representing the blue folder a> in which to insert the copied contents.folder item attached in the Browse section of the application (under the heading Positions) and then choose the iPhone present on the Home screen and/or in the App Library of your iPhone, press on the
At this point, perform a long tap on without icons, select Paste. Amazing, right?JPG from the menu that opens and that’s it. Pasted photos will be automatically converted to
If, however, you intend to change the photo format from HEIC to JPG in the new photos you will take with the camera, know that this is also doable. To do this, simply go to Settings > Camera > Formats and select Most compatible, which will always use the JPEG format, as indicated in the notes of the setting itself.< /span>
How to change iPhone photo size
Do you want to change iPhone photo size? Well, if you intend to act on the camera settings, to take photos at a larger or smaller size than the one currently set, know that this can be done by acting from the system settings. To do this, however, you need to have an iPhone that supports multiple resolutions and focal lengths.
On iPhone 15 and later models, for example, you can choose between 12 MP, 24 MP or 48 MP. To make this change, open the app Settings by tapping on the gray icon with the gears located on the Home screen and/or in the App Library of your “iPhone” and then presses the item Camera. At this point, press on the words Formats > Photo mode and select the format you are interested in between 12 MP or 24 MP.
If you intend to set the resolution to 48 MP, as your iPhone supports this resolution (for the record it is available on the iPhone 14 Pro and iPhone 15 and later models, as you can see by comparing the technical characteristics of the iPhones on the Apple website), after going to Settings > Camera > Formats, enable Resolution Control or ProRAW Control and Resolution (depending on the model you have). Then it is possible to select the ProRAW resolution using the appropriate wording (based on the iPhone model you own).
I remind you that the ProRAW format combines the information of the “standard” RAW format with the iPhone’s graphics processing, which makes It is possible to adjust all the main shooting parameters (e.g. exposure, contrast, shadows, lights, white balance, colors, etc.) in the post-production phase.
Finally, if you are looking for apps to shrink photos (or even enlarge them), all you have to do is consult the tutorial I dedicated to the latter.