
If you have problems getting all the achievements in Resident Evil 4, this material will help you overcome problematic moments, reveal the secrets of the game and complete most of the “achievements” in a few runs to get the coveted “Platinum”, “1000G” or “100% achievements on Steam”

If you have already completed the Resident Evil 4 remake and want to complete all the achievements – you liked the reimagining so much – then you have come to the right place. However, if you want to reduce the time it takes to receive “achievements” and do them in your first playthrough, don’t read this text yet. There will be plot spoilers and strategies that will spoil the experience. First, go through the game at a comfortable pace, explore the locations and enjoy the story – half of the achievements will be completed on their own.
All Achievements Guide In Resident Evil 4
To begin with, let’s decide on the order of passing the game. After the first playthrough, a save with the “New Game+” mode will become available, which we will use. Let’s start with him.
Easy+ difficulty with most achievements completed
In New Game+, Leon retains all his weapons and their upgrades, the main character’s health, and several types of knives – this will help him complete some of the most difficult “achievements.”
Lean minimalist
A pumped-up pistol and knife will be needed for the “Minimalist” achievement – according to his condition, you need to complete the game only with a bunch of these weapons. You can use any 9mm pistols – revolvers are not allowed. Create pistol cartridges using materials and gunpowder – fill your opponents with lead.
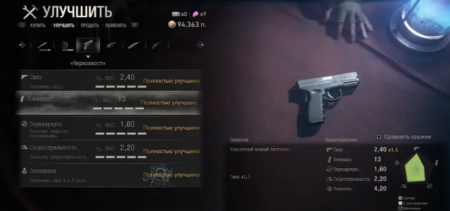
Chicken eggs also cannot be equipped – completing the Trader’s contract and quickly killing Salazar with a golden egg will have to be postponed for another run. Grenades, unfortunately, also remained out of use. However, this run involves the use of a harpoon on the boat, machine guns on the “Island” and a special rocket launcher at the end of the game – these weapons are allowed to be used. It is also possible to pick up other weapons, such as a sniper or assault rifle with a biosensor sight, to search for parasites inside the regeneradors. However, you can’t shoot from them – you’ll have to kill the reptiles with a pistol.
“Simplified” difficulty with upgraded weapons takes less than 8 hours, even with collecting all the treasures in the “Village” and “Castle” locations. By meeting this deadline, we will also complete the “Sprinter” achievement . But if it doesn’t work out, the achievement will appear automatically on the next runs.
During the same run, complete the “Thrifty” achievement – using any means of restoring health is prohibited. Herbs, fish, snakes – all this will be sold to our dear talkative assistant Merchant.
Hint: you can check whether these achievements have been completed correctly in the “Challenges” menu while paused. On the lines “Lean” and “Minimalist” there should be a description “Progress: 0”. If there is “Progress: 1” or higher, you will have to roll back the save to an earlier one in order to reset the counter.
By the way, if you didn’t complete the “Shooting Range Legend” achievement during your first playthrough , do it now. Get a body kit for a case in the shape of a rhinoceros beetle from the balls (for coins) – it will help increase Leon’s capital, and this is one of the most important parts of the second run. The “Teddy Bear” and “Don Jose” keychains from the shooting range will also help – the first reduces the required amount of gunpowder for crafting by one unit, and the second gives a 15% chance to create additional cartridges for a pistol.
Don’t hesitate to collect all the treasures – this is necessary for the achievements “Robber” , “Robber” and “Plunderer” , which are awarded for collecting treasures in the locations “Village”, “Castle” and “Island”, respectively. But even if you completed them on your first playthrough, collect them again.
Repeated collection of treasures is also necessary in order to collect 2,000,000 pesetas to purchase the “endless rocket launcher” – a bonus weapon that appears only on the second and subsequent playthroughs in the “New Game+” mode. We will need it in the third run.
Hint: at the same shooting range you can get the “Leon with a Rocket Launcher” keychain, which gives a 20% discount on the purchase of any weapon of this type – and it turns out you need to collect 1,600,000 pesetas.
The figure looks scary, but I managed to do it before passing the island. Sell everything you can: combine medicinal herbs in the form “Z+Z+Z” and “Z+K+Zh” – the latter is a priority, because it costs 10 thousand (20 thousand with a beetle keychain) pesetas for one flask; all ammunition for unused weapons; grenades of all kinds; small knives if there is no point in them. It is possible to save up for a rocket launcher before arriving on the “Island”. The main thing is to repair knives and body armor.
Completing the achievement “Smart Jeweler” will also help in increasing your capital . To complete it, you need to find a “crown” decoration and insert five different stones into it: sapphire and yellow diamond in the round holes, emerald, alexandrite and beryl in the square holes. Ruby will not work – it is the same color as beryl, but sapphire and alexandrite are different colors.
If you understand that you won’t be able to collect money by the end of the game, then just sell the upgraded weapons – everything except the pistol and knives. Improved weapons cost from 200 to 400 thousand pesetas – this will help replenish your piggy bank. Moreover, we won’t need them in the next playthroughs.
Search for treasures and clockwork machines
Here you will not find a complete guide to each treasure – the game has a convenient map for this. However, just below there is a list of easily missed chests and how to get them.
Always search the area thoroughly for the Small Key item – it can be used to open locked boxes in different parts of the Village and Castle levels. Also, always check the map for nearby treasures – this will help you not to miss decorations and stones.
“Small Keys” in the “Village” and their affiliation:
- In a location called “Valley”. From there you need to pick up the hexagonal coat of arms with an eagle according to the plot. The key is in the same building on the roof of which there is an altar with a plot item. Go down the stairs from the altar, and then go into the small room on the left (if you look at the stairs) – the “Small Key” lies in a locked box. Needed for a box in the Abandoned Factory location, which is located behind the lowering gate.
- In the location “Elder’s House” – lies to the left of the main entrance on a small stool. Opens a box in the second house on the left (the first can only be reached by dropping Ashley off when visiting again) on the main village square – the first big skirmish with enemies takes place there.
- In the Fish Hatchery location, in the small barn on the left, if you look at the house, where according to the plot you need to take a canister of fuel for the boat. Easily missed if you don’t know it’s there. Opens a locked box, which is located next to the merchant and the first shooting range – to do this you will have to go down the stairs to the level below.
- In the “Lakeside Settlement”, open the door using the “Key with a Sign” found in the story and climb up – there is an altar, next to which there is a cart. There is a small key on it. Opens the box in the house where the protagonist finds Luis Sera at the end of the first chapter.
- In the “Church” location, to the right of the fresco control mechanism. Needed for a box in the side room of the church, where there is also a plot descent into the caves – Leon used it in the third chapter to get to the island.
“Small keys” in the “Castle” and their belongings:
- In the corridor after the puzzle with the slabs on the door. Located to the left of the place where the first parasite in the game runs along the wall. Opens the locked box that is in the puzzle room where Leon meets Ada face to face for the first time.
- On the way to the Armory, on the second floor of the Main Hall. It is located on the left in the box, in the room with the knights. Needed to open the box in the “Audience Hall” – you can get there again from the merchant’s room by sitting on the trolley.
- In “Chapter 12” do not rush to take the trolley to the clock tower. Next to her, on the table, lies a “small key” – it is needed for a box in one of the siege towers. At the top of this tower there is a cannon from which Leon was supposed to kill the armored giant in “Chapter 8” – you will have to go back.
Resident Evil 4 also has a few areas that are easy to miss and can’t be returned to. There are treasures there, which also count towards the achievement and we need to buy a rocket launcher.
Easy-to-miss Village Treasures:
- In the Abandoned Factory location, there is a sapphire in the second furnace;
- The “Ancient Camera” artifact is located in the “Elder’s House”, but you can only get to it after Ashley is in the church, in “Chapter 5”;
- The treasure hangs on a tree in front of the castle, near a broken car.
Treasures of the “Castle” that are easy to miss:
- In “Chapter 9,” after completing the labyrinth garden, return with Ashley to the “Wine Cellar” location. There is an opening above one of the doors where a girl can crawl through. If you don’t do this after passing through the garden, then you won’t be able to pick up the treasure in later chapters;
- During the segment for Ashley, carefully check the map and look for all the chests locked with keys. The first one will be in the library, on the first floor, behind one of the shelves – opens with the second key; the second chest next to the recess for the coat of arms, on the left behind the shelves – opens with the fourth key; the third chest is located in the dungeon, behind the screen, immediately after the room where you need to hit four bells – it opens with the first key;
- The gold bar is located behind a destructible wall, after the second ride on the trolleys with Luis Sera – you need to shoot the barrel in one of the openings in the north-west of the location for the wall to collapse;
- Return to Ramon Salazar’s throne room – there is a golden egg there, but you can get it after solving the “cube puzzle” on the box;
- In the clock tower, go up the steps to the very top, but do not jump onto the platform with the elevator – instead, go a little higher, push Leon against the iron gate and turn left. There will be a break in the railing, and on the wooden platform there will be a treasure chest.
Easy-to-Miss Island Treasures:
- After meeting the first rocket man, go up to the same bridge where he stood, go further and shoot at the barrel – it will destroy the wall behind which the chest is hidden;
- In the next location there is a fork – on the left is the story path, while on the right is a new group of enemies. They guard the chest;
- Before the second meeting with the Merchant in the kitchen, where a burning enemy jumps out at Leon, step back and turn left – there is a case with a treasure in a small opening;
- In the “Freezer” you need to solve a puzzle to open the door to the LE5 submachine gun or gold bar lying there in the second and subsequent playthroughs;
- After finding Ashley and going outside, go down to the large arena, go a little further into the “Container Storage” – to the left of the entrance there will be a trash bin with treasure inside;
- In the room with the huge amber, behind the box to the left of the main exit, there is a “Crystal Ore”;
- At the beginning of “Chapter 16”, on the way to the last boss, return to the altar where Ashley lay and Leon was attacked by Osmund Saddler – the Los Iluminados pendant is there.
Full guides (in English) with images can be found here: “Village” , “Castle” , “Island” .
The location of the “Clockwork Keepers”, which also need to be defeated, can be found here (guide in English). There are 16 of them in total – one collectible item per level. You can find them even without a guide – after all, a mechanical sound is heard next to them, but it is not always possible to hear it. For their destruction, Leon receives the “ideal knife” – it will be needed on the “Hardcore” difficulty, when receiving the S+ rank.
Achievements related to level segments
Resident Evil 4 also contains “achievements” related to fulfilling conditions in chapters. There are 8 such achievements in total and they are best completed on the second and third playthroughs.
Cover Your Eyes : Kill at least three enemies with a flash grenade. You can do it with a bunch of fanatics with a parasite instead of a head, or with a flock of crows.
“Overkill” – kill a fanatic with a cannon. The easiest place to get it after killing an armored giant. Turn the cannon toward the gate, but shoot the cultists on the steps. There are three of them there, someone will definitely be hit by a cannonball shot.
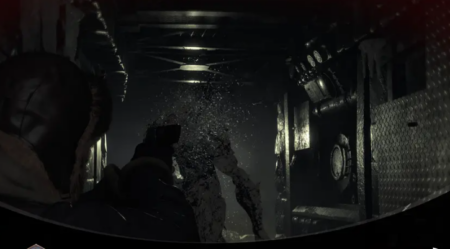
“I don’t see a problem” – you need to kill the garrador (a blind enemy with claws) only with a knife. The tactics are simple – we run away from the corridors with cameras into the arena with screens. We sit around the corner on the right and wait for the enemy to come to us. We approach him on our haunches, very close, and press the button to strike with a knife only when the prompt appears. After the hit, we squat down and move back a little – the garrador will rush around the arena and swing its claws in all directions. We wait until he hits behind his back and calms down, and then we repeat. On the “Simplified+” difficulty level, it can be killed with a pumped-up Jack Krauser knife in five hits.
Bloodhound’s Last Case is a missable achievement. We need to kill Ramon Salazar’s bodyguard, Verdugo. This monster overtakes Leon in a compartment with an elevator, which you must first launch and then wait for its arrival. Tactics on “Simplified+” – activate the panels on the wall when Verdugo is nearby, freeze him, kick him and shoot at him as much as we can until the freeze subsides. We run to the next panel with liquid nitrogen and repeat it all over again. Three freezes should be enough, but if Verdugo is still alive, there is another panel in front of the elevator room. If this was not enough, the monster can be killed without using freezing. Can also be performed while passing with a rocket launcher.
“Do you like extreme?” – one of the most difficult achievements with conditions. You need to complete both trolley rides without being damaged. It will take time and practice, but there are a few tricks. Save before your first trip and start training to shoot all enemies when they appear. The second trip can be restarted from an autosave – just load it from the pause menu. A monster with a chainsaw can be killed by shooting at the trolley – after 10-15 hits it will break, but do not lose sight of other villagers and obstacles on the way. It’s better to shoot at the boss with a chainsaw when he starts to swing – this will make him shake himself off and the blow will not occur. You will have time to shoot the remaining opponents.
“This elevator is busy” is the second difficult achievement with conditions. While climbing the clock tower, you need to make sure that no one jumps onto the elevator – this can be done even with a pistol, but you will have to train and quickly look for enemies. There is a shieldman on one of the balconies – shoot at him as soon as you see the shield. Otherwise, the enemy will jump and the elevator will immediately stop due to his weight.
You talk a lot” – you need to throw a grenade into the mouth of the boss “Ramon Salazar”. This can be done right from the start of the battle – Ramon flies up to Leon with his mouth open. You just need to get closer and throw a grenade at him. If it explodes immediately, you did everything right. Attention!!! Do not complete this achievement during a run with a knife and a pistol – this will reset the progress towards obtaining the Minimalist achievement.
“Two reptiles with one shot” – shoot two parasites in the body of a renegador at once with a shot from a sniper rifle. Enlighten the creature with a biosensor sight, select a suitable angle and shoot. The achievement is easy, but do not complete it while completing the “Minimalist” achievement.

Getting all weapons
To complete this achievement, you will have to collect 29 types of weapons, including bonus guns. Small knives, grenades, and chicken eggs of all kinds are also taken into account.
A list of all weapons can be seen here. We are interested in collecting bonus weapons, and while the guide was being written, one of them became much easier to obtain.
- An endless rocket launcher is purchased at the end of the “Simplified+” passage – you need to collect 2,000,000 pesetas or 1,600,000 if you have a discount keychain;
- Perfect knife – awarded for destroying all clockwork keepers;
- The Bombarda is a revolver that is now easier than ever: you need to complete three maps in the free Mercenaries mode to rank S. To do this, you need to score 200,000 points – do combos, save grenades and a shotgun for a large crowd of enemies, use the Fury mode “on bosses. Completed in 15-20 minutes of real time.
- Chicago Broom – can only be obtained by completing the Professional difficulty level to rank A or higher. This is exactly what you should do after completing Simplified+. We will need this weapon to obtain the coveted achievement “Expert Category S+” .
To get the achievement, you need to buy all the bonus weapons in the “Bonuses” menu and go to any save in the game. Then enter the typewriter menu, select “Storage” and move the cannon to your inventory.
Leon is a professional
So, the “Simplified+” difficulty mode is over. The rocket launcher purchased on the previous playthrough is in the storage or inventory, depending on where you left it. Now Leon is unlimited in almost everything, except for one condition – we cannot talk to the merchant to obtain the “Silent Wanderer” achievement . Yes, we don’t need this.
Without collecting cartridges and treasures, we rush through the levels like a knife through butter. Be careful though – Ashley’s rocket launcher also kills! Always tell her to stay away if you want to cause Armageddon in a location. There are no autosaves at the Professional difficulty level – you will have to start the level from a recording machine.
Problems can only arise during the first knife fight with Jack Krauser. But don’t worry – for our purpose, no one prohibits restarting the game from a previous save. Moreover, before the battle with Krauser, it will be next to the merchant, in a small opening – it’s hard to miss the machine.
The main goal is to achieve an A rank or higher, and to do this you need to set a time record. You can’t get S+ rank on a “New Game+” save, but it’s quite possible to get S rank. For A rank you need to keep the timer within 7 hours – you can see it in the pause menu in the “Results” tab. Also, if Leon or Ashley died, do not click the “Continue” button. Go to the main menu and start saving from there. This will roll back the timer to the previous value, because the “Continue” button takes into account the time already spent in the session.
I would suggest keeping this playthrough under 5 hours and 30 minutes and practicing the location skips described below if they are not needed to complete any achievements. This will be a kind of training for the final run, and the “Unrivaled Agent” achievement is given simply for completing it. My run record with the rocket launcher is 2:50:18 and S rank.
Hardcore, last, yours
There is only one milestone left before platinum – to pass normal and “Hardcore” difficulties to the S+ rank. The tips that can help you do this apply to both modes. Whether to complete the walkthrough on standard difficulty first or leave it at the end is your choice.
To get “ Mission Complete: S+ ” and “Expert Category S+” you will have to start a new game with a clean save. There’s no infinite rocket launcher in sight, but we didn’t just beat the game twice before.
All bonus weapons that were available through the “Bonuses” menu item will be available even with a clean playthrough. This means “Bombard”, “Chicago Broom”, and “The Perfect Knife” – all of them will become the basis for passing for the S+ rank.
In the “Additional” menu, we put on Ashley the armor received during the previous passage – in it she is invulnerable to both enemy attacks and random hits from Leon. Opponents cannot drag her away – she is too heavy for them, and therefore they immediately drop her. However, there are a couple of moments where Ashley can still be taken away – according to the script. If a girl asks for help for five to seven seconds, run to the rescue.
The goal is still the same – to complete the game in five hours, but now without the endless rocket launcher. But we will have an endless submachine gun, which will first need to be upgraded and this must be done in “Chapter 7” – then it will be more difficult, you will have to get out. Until this moment, you must complete all the Merchant’s tasks along the way and collect 30 spinels to purchase a ticket for the “exclusive upgrade” for the Chicago Broom. Or buy a ticket in the Steam, PS Store or Microsoft Store for real currency – if you don’t mind the money or want to quickly run through the game.
After that, we act according to the old drawings: we sell unnecessary weapons, leaving only a pistol and a sniper rifle for accurate shots; If you come across some treasures along the way, or in the last couple of playthroughs you remember where they are, collect them and sell them to the merchant to upgrade the “Chicago Broom” in other parameters and buy more powerful weapons. Don’t spare a couple of seconds to break resource boxes – ammo and first aid kits will be in short supply.
Get used to the idea that on “Hardcore” you will often see the red inscription “You are dead” – this is an integral part of the process. Go to the menu—be sure not to click “Continue” or “Load” on the loss screen—and select the last autosave from there. This will roll back the time on the timer. Also, do not look through your inventory for a long time and connect jewelry with stones as quickly as possible – at these moments the game is not paused.
Tricks and secrets for quick passage
Chapter 1
After the battle in the village and moving to the farm, where you need to find a part of the mechanism and open the gate, shoot the barn lock – it is clearly visible from the street and this will save a few minutes. Search the box on the left near the entrance and break the barrel, and only after that take the part. Climb up, open the gate and run away from the angry residents.